547_Sharpening_Station_Upgrade.mp3

Matt's Basement Workshop Podcast
enJune 05, 2015
In the never-ending quest to answer the timeless woodworker question "what do you do with your scraps?" I have yet another answer, photo clipboards!  Actually, this one came directly from my beautiful and amazing wife Samantha, who was looking for something new to present to her wedding photography clients.
The concept is simple. Take a beautiful piece of scrap wood, shape it a little if necessary, clean up its surfaces so there's no splinters, apply a simple finish to protect it and attach a clip to one face.
The result is an amazingly simple project that can be as big or small as you need for your presentation and a great way to clean out your scrap pile (or to just experiment with some pricey exotics without breaking the bank.)

When I first came up with the basic design for Madison's dresser I knew I wanted to incorporate turned feet into it.
I'm still as novice a woodturner as anyone can be, but as I've learned over the years the quickest way to becoming better is to be at the tool rest as frequent as possible.
So for today's episode it's all about my time in front of the lathe turning and shaping the four tapered feet that support the entirety of the dresser.
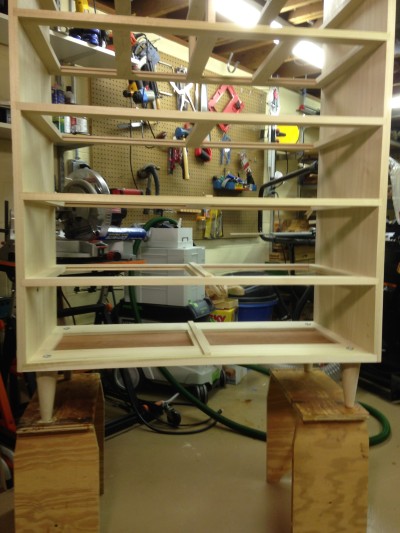
Originally I tried to convince myself that a much simpler form would suffice, but once we had the plans together there was no doubt in my mind a tapered turned foot was a must.
I'm sure this style of design has a given name (they all do,) but whatever it is, it just appealed to me as I thought about what my daughter would like for her own piece of furniture.
The turning and tapering process is really simple, as you'll see when you watch, but it wasn't until I started the fourth foot that I finally found I had been way overcomplicating the process.
I obviously spent way to much time overthinking, and being overcautious (don't confuse this with being flippant and cavalier about my safety) in how I was approaching it.
The difference in time to accomplish the same task from the very first foot to that last one dropped dramatically.Too bad I didn't film that last one though.
Still, the technique I demonstrate achieved the same result and was only about 1-2 minutes longer in overall time.
My take away lesson in all of this? "Don't be shy with hogging away the material." Get right in there and get to work removing the waste quickly (and safely) so you can start finessing the final shape quicker.
A full set of detailed plans are available for sale on my website, thanks to Brian Benham of Benham Design Concepts.
You can find them by visiting our new "Digital Downloads Store" by clicking here.

Stay up to date
For any inquiries, please email us at hello@podcastworld.io